
HowTo: Multiple ISPs/WANs SonicWALL649
Pages:
1

|
LiquidLayer private msg quote post Address this user | |
| Source Post via UpTimeMadeEasy.com Configuring Multiple ISPs/WANs on SonicWall Firewalls If you have used the internet then you know that there will be disruptions and that many of those disruptions are caused by your ISP. The best part is that you can minimize ISP caused internet disruptions by having multiple ISPs and configuring your router/firewall to failover properly when one link has a failure. The SonicWall firewalls have built in support to manage multiple ISPs with failover. While this article was created using a SonicWall TZ 215 running SonicOS Enhanced 5.8.1.13-1o, the steps are pretty much the exact same using other SonicWall models and SonicOS versions, such as my NSA 3500 running SonicOS Enhanced 5.9.0.3-117o. Everything is pretty much the same. Differences will be seen in the number of interfaces. This article will explain configuring multiple ISPs/WANs on SonicWall firewalls. 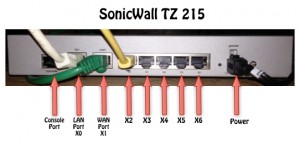 Inbound vs Outbound Link Balancing The important thing to understand is the difference between inbound and outbound ISP redundancy. If you have servers on the inside of your network that need to be accessed from outside, you will want to have inbound redundancy. You may wish to read a previous article on Link Balancers that explains how this can be done. However, if what you need is just outbound link balancing, then your SonicWall should be able to do exactly what you need. Even better, this article will show you how! Configure Your SonicWall for Multiple ISPs/WANs Step 1 – Physical Connection Your SonicWall will typically have multiple interfaces that can be used for ISP connections. In the image above the typical LAN(X0) and WAN(X1) interfaces are likely already being used for your first ISP/WAN and your LAN. For this example, I used interface X2 for my second ISP. If it is available, then plug your second ISP’s uplink cable there. Step 2 – Configure Your X2 Network Interface Next, we need to login to the SonicWall Firewall with your web browser. Navigate to Network / Interfaces. Find X2 in the list and click on the pencil edit button for X2. First, you will want to set the Zone for this interface to “WAN”. Next, you will type in the static or DHCP IP Addressing information that your ISP gave you. If you want to be able to manage your SonicWall using this address and interface, then allow that by checking the protocols on the Management Line.  Click Ok, when done. Step 3 – Browse to Network / Failover & LB Enable load balancing by checking the “Enable Load Balancing” check box, then under “Groups”, find the “Default LB Group” and click the Configure / Pencil button for the Default LB Group. At this point, you will need to choose a “Type” for this Load Balancer. There are 4 types to choose from: * Basic Failover – Probes the internet on both interfaces, but all traffic goes through your primary. If the primary goes down, traffic goes through secondary. * Round Robin – Traffic goes equally over both ISP interfaces. If one goes down, all traffic goes through the one that is still up. * Spill-over – All traffic up to a specified MBPS rating goes through the primary ISP interface, traffic over the threshold goes through the secondary ISP interface. * Ratio – When both ISP interfaces are up, traffic goes through each using a specified ratio that we configure adding up to 100% (70-30,60-40,etc…). Make your “Type” choice. I chose “round robin” which makes the options you see above. I then chose the X2 interface and added it to the Selected Interface Pool on the right using the “Add >>” button. Your options will be slightly different depending on the “type” choice you chose above. For Spill-over, you will choose how much bandwidth to use on the primary before spilling traffic over to the secondary interface. If you chose ratio, you will decide what percentage of the total traffic to send over each interface.  Configure Probing Probing is what is used to detect if an ISP is up and operational or not. We tell it how frequently to check the interface, how many failures it takes to deactivate the interface, and how many successful checks to make before reactivating the interface again. We also can check the “Probe responder.global.sonicwall.com on all interfaces in this group” to have it probe the SonicWall system through each interface for the probe. Set these the way you want and then… Click Ok. This will bring you back to the Failover and LB page.  You should see something similar to what is shown in the image above with both interfaces in the group and statistics displaying. Be sure to click the “Accept” button. Your SonicWall should now be configured for Failover and Load Balancing. Source Post via UpTimeMadeEasy.com Performance Hosting, Wordpress, Blogs, Web Sites: Liquid Layer Networks | Performance Cloud Web Hosting http://www.LiquidLayer.net ParagonHost Networks | Web Hosting since 2000 http://www.ParagonHost.net |
||
| Post 1 • IP flag post | ||
Pages:
1