Configure Bandwidth Management 5.9 SonicWall615
Pages:
1

|
LiquidLayer private msg quote post Address this user | |
| UTM: How to Configure Bandwidth Management in 5.9 Firmware (SW11092) Article Applies To: Gen5 NSA E-Class series: NSA E8510, E8500, NSA E7500, NSA E6500, NSA E5500 Gen5 NSA series: NSA 5000, NSA 4500, NSA 3500, NSA 2400, NSA 2400 MX, NSA 240, NSA 220, NSA 220 /W. NSA 250M, NSA 250M /W. Gen5 TZ Series: TZ 215, TZ 215 W, TZ 210, TZ 210 W, TZ 205, TZ 205 W, TZ 200, TZ 200 W, TZ 105, TZ 105 W, TZ 100, TZ 100 W Firmware/Software Version: 5.9 Firmware & above Services: Bandwidth Management Feature/Application: SonicOS Enhanced offers an integrated traffic shaping mechanism through its Egress (outbound) and Ingress (inbound) bandwidth management (BWM) interfaces. Outbound BWM can be applied to traffic sourced from Trusted and Public Zones (such as LAN and DMZ) destined to Untrusted and Encrypted Zones (such as WAN and VPN). Inbound BWM can be applied to traffic sourced from Untrusted and Encrypted Zones destined to Trusted and Public Zones. This KB explains about the bandwidth management for VOIP traffic from any source to any destination from LAN>WAN for VOIP service (Default VOIP service in sonicwall) Video Tutorial: Click here for the video tutorial of this topic Types Of Bandwidth Management in 5.9 Firmware: Advanced Maximum egress and ingress bandwidth limitations can be configured on any interface, per interface, by configuring bandwidth objects, access rules, and application policies and attaching them to the interface. Global (Default) All zones can have assigned guaranteed and maximum bandwidth to services and have prioritized traffic. When global BWM is enabled on an interface, all of the traffic to and from that interface is bandwidth managed. Current Limitation: BWM can be only applied to WAN zone interface with some limitation to multi-interface zone BWM can be only configured on “Access Rules” and “Application Firewall Actions” page individually Enhancements: Per-IP/User BWM (i.e. each FTP user (IP) get a max bandwidth) More accurate bandwidth reporting New choice for BWM violation; drop or delay Procedure: Step 1: Enabling Bandwidth Management Step 2: Configure Bandwidth management in WAN Interface Step 3: Creating Bandwidth Object Step 4: Creating access rule with Bandwidth management Note: Once BWM has been enabled on an interface, and a link speed has been defined, traffic traversing that link will be throttled—both inbound and outbound—to the declared values, even if no Access Rules are configured with BWM settings. Step 1: Enabling Bandwidth Management Please login to your Sonicwall Management page and follow below steps 1) Navigate to Firewall Settings -> BWM, 2) On the right side select Advanced radio button near Bandwidth Management Type 3) Click Accept Button at the top. 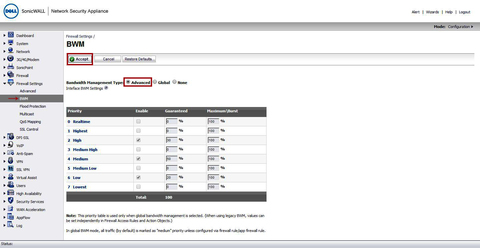 Full Image Step 2: Configure Bandwidth management in WAN Interface Please login to your Sonicwall Management page and follow below steps 1) Navigate to Network -> Interface, on the right side configure your WAN interface to get Edit interface X1 Window. 2) Go to Advanced tab to see Bandwidth Management section 3) Select “Enable Interface Egress Bandwidth Limitation” check box Maximum Interface Egress Bandwidth (kbps): 800 (Type the upload speed of your ISP in Kbps) 4) Select “Enable Interface Ingress Bandwidth Limitation” check box Maximum Interface Egress Bandwidth (kbps): 800 (Type the download speed of your ISP in Kbps) After configuring above information click OK button. 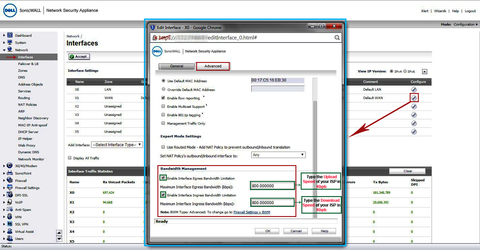 Full Image Step 3: Creating Bandwidth Object Please login to your Sonicwall Management page and follow below steps > Navigate to Firewall -> Bandwidth object, on the right side click Add button Name: VOIP Traffic (Type any Friendly Name) Guaranteed Bandwidth: 300 (Type the required value which should be given out of total bandwidth) Maximum Bandwidth: 800 (Type the maximum value which can be given in more bandwidth available) Traffic Priority: 0 Realtime (Select priority out of eight default queue) Violation Action: Delay (Either select Delay or Drop for the traffic violating this bandwidth). Click OK button to create a bandwidth object 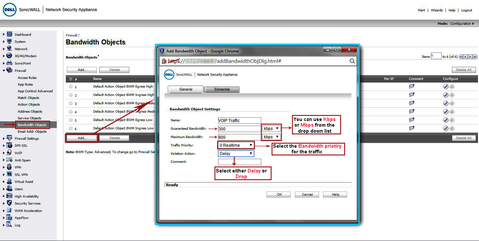 Full Image Step 4: Creating access rule with Bandwidth management Please login to your Sonicwall Management page and follow below steps 1) Navigate to Firewall -> Access Rule 2) Select the type of view in the View Style section and go to LAN to WAN access rules. 3) Click Add a new entry and create the rule by entering the following into the fields: Caution: The ability to define network access rules is a very powerful tool. Using custom access rules can disable firewall protection or block all access to the Internet. Use caution when creating or deleting network access rules. >> General Tab: Configure access rule for VOIP service, Allow rule from Any Source to Any Destination for All Users from LAN>WAN. 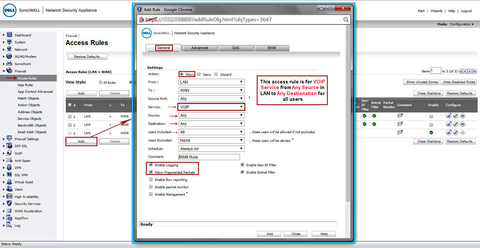 Full Image >> BWM Tab: 1) Select “Enable Egress Bandwidth Management (‘Allow’ rules only)” Bandwidth Object: VOIP Traffic (Select the bandwidth object which you created) 2) Select “Enable Ingress Bandwidth Management (‘Allow’ rules only)” Bandwidth Object: VOIP Traffic (Select the bandwidth object which you created) Click OK button to create access rule with bandwidth management. 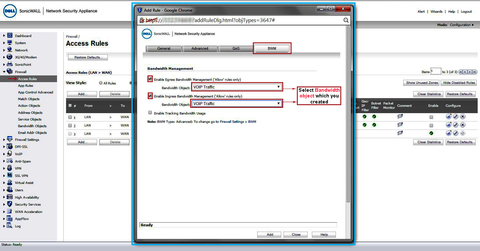 Full Image The access rule will have the bandwidth icon in it with status information 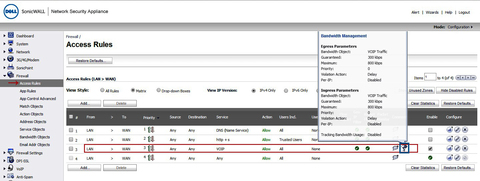 Full Image See SonicWall Video Here UTM: How to Configure Bandwidth Management in 5.9 Firmware (SW11092) Liquid Layer Networks | Performance Cloud Web Hosting http://www.LiquidLayer.net |
||
| Post 1 • IP flag post | ||
Pages:
1
